Monday, June 24, 2013

Taco Pie


Quick and Easy yummy taco pie!

My husband and I ate the whole pie....in one sitting! Easy Summer meal or a solid comfort food on a cool day, how versatile is that?

Brown 1 pound ground beef, drain and season with one packet taco seasoning. Set aside.
Line a deep dish pie pan with a package of croissants, separate into triangles and then press and manipulate them to cover entire pie pan, press seams together.
Place beef inside and top with 1/2  c chunky salsa.
Sprinkle with 1/4- 1/2 c cheese, and 1/2 small onion chopped.
Bake at 350 about 20 minutes or until croissants are golden.
Top with more salsa, cheese and chips.
 Add sour cream, jalapenos etc


before the oven


Tuesday, April 30, 2013

Cakes! Cheese, Birds and Dinosaurs - Latest Creations


Life got ahead of me and I was going to make separate posts for some of the latest cakes, but, that didn't happen so I am going to share them all in one post!


Inspired by Pinterest of course and Food Magazine I set to making cheese cake....well not really.

But a couple little cakes covered in fondant and some little fondant mice....


Holes in cake were made with a melon scooper.

black licorice tails

One sweet little boy!
who also had a birthday!!


His mom and I decorated a dinosaur cake with cupcakes too!


 I also threw in my daughter's wedding shower....


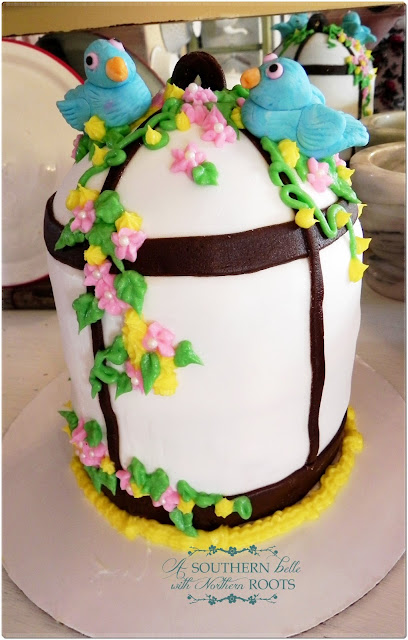
A yummy chocolate and red velvet bird cage cake.


Then, made the the wedding cakes....


See the wedding cake post HERE
 I also made a few cupcakes for a benefit


chocolate cupcakes with vanilla "spaghetti" and cake ball "meatballs" and a little strawberry jam "sauce"


You might think I am sick of cake.....
but I am not, well maybe a little. We had to eat a lot of left over wedding cake! But although I am a complete novice at cake making I still love to create and learn as I go along!


Tuesday, April 16, 2013

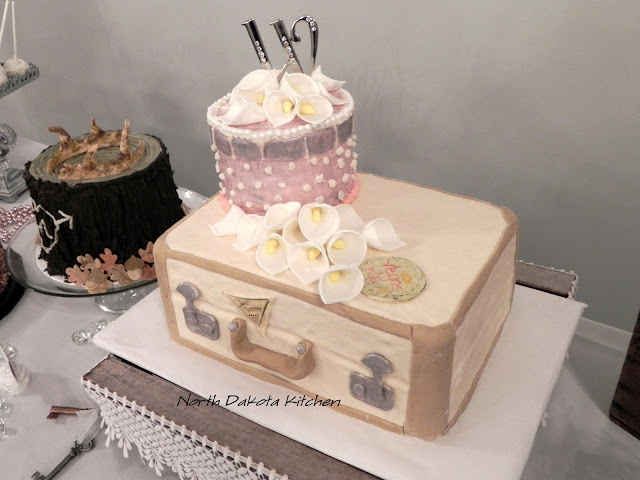
Wedding Cakes! Vintage Suitcase and Tree Stump Groom's Cake


We have eaten the last piece of cake.
NOT-
We have eaten the last piece of cake that is not in the freezer.
I am sick of cake.
Well until next week maybe.
The final days before the wedding, I and my step mom Rachel, took up mixers and enough butter to choke Paula Dean. ( I love ya Paula!!)
In fact our tally was.....10 c butter, 38 eggs, 25 c flour and 6 1/2 c sugar later- plus cake pops- and a burnt cake which will not be discussed in this post.

Rachel set out to conquer the groom's cake. Our new son in law loves to hunt and shoot as does his father and new father in law-
so I fashioned some marshmallow fondant deer horns- of which were wrong, redone, wrong again (according to men) and then just settled on.
Insert the look of the mother of the bride on wedding overload covered in powdered sugar looking over her glasses ready to slap the next man with cake advice.


Rachel created the cutest tree stump ever!!
Tree before antlers and leaves


I took on the vintage suitcase cake. And made a massive mess in the process...a neat baker I am not.
painting marshmallow fondant tags

working on hat box


the suitcase- never weighed it but it was heavy!!

Our cake pop display

 Note- Do NOT dip frozen cake pops- It indeed makes the stick stay in place better and is actually easier to work with but when the cake thaws it cracks the candy coating-
How to fix?
Pout
Double dip when all the cracking is done
This results in goofy shaped, heavy coated, unique imperfect pops I like to call....
vintage style-(just go with it)


We also- no I also bought cakes at Costco- lots of flavored cakes which meant we had cake coming out our ears. See first comment on post.
My poor company got nothing for dessert but cake-
They almost got nothing for breakfast but cake!
 My lovely daughter and her sweet new husband cutting cake.


 Here is the final cake spread- Go big or go home (take a piece of cake when you go please)


As of today I have been a mother in law for....
12 days now!
Slowly getting things back in order. I have a cold, the house is still fairly messy, some of the wedding items still need to be put away or sold, it snowed a foot of new snow and it will not get out of the 30's (mid April here!)....but the wedding is over and I can relax. It was a great time..
You can see some of the first photos HERE and see wedding prep posts HERE
or Click on A Southern Belle With Northern Roots and hit the wedding category.


Open House Party
Vintage Inspiration Friday
What's It Wednesday
WOW Us Wednesdays
Vintage Thingy Thursday
Time Travel Thursday
Creative Things Thursday
Share Your Cup Thursday 
Home Sweet Home
Funky Junk
Home and Garden Thursday
Shabbilicious
Simple and Sweet Fridays
Potpourri Friday
Be Inspired
Cowgirl Up
Tabletop Tuesday
Show and Tell Friday
Sunday Showcase
Old Time Party
Rustic Restorations 
Nifty Thrifty Tuesday
Lovely Crafty Home
Nifty Thrifty Things
Or So She Says
What We Accomplished Wednesday


Thursday, March 28, 2013

Hometown Throwdown!


Attention North Dakota cooks!- and those of you in Clay county Minnesota.
Cass Clay Creamery is holding a hometown throwdown cookoff and you can apply by clicking here.
Check out rules and guidlines HERE

Cass Clay is known and trusted for their quality dairy products and I have used them for years!
So, if you love to cook or bake- grab your recipes and some Cass Clay dairy and whip up an entry!!


Cass-Clay Creamery

Cass-Clay Creamery on Facebook


Official Rules click HERE

Thursday, March 21, 2013

Asparagus Ham Rolls


Asparagus!!! I have been eating it every day. Not like this..... wonderfully indulgent and filling, with ham, cheese, and asparagus drowning in Hollandaise, but a healthier version. However if your having some guests you would like to spoil this would be a wonderful treat or a perfect Easter breakfast.

First
clean and snap your asparagus, there is a natural snap at the bottom that will eliminate the woody end. If your asparagus is thicker you may need to peel it, that is why I try to use smaller thin stalks. Use a vegetable peeler and remove the outer fibrous layer if necessary.
Steam stalks for 15 minutes.
Wrap your favorite cheese and a nice slice of ham around 4 stalks, then place a toothpick in to secure roll.
Make your Hollandaise sauce and spread evenly, bake at 350 for 20 minutes or until everything is bubbly and heated through.


Hollandaise Sauce - via Food Network

Ingredients
4 egg yolks
1 tablespoon freshly squeezed lemon juice
1/2 cup unsalted butter, melted (1 stick)
Pinch cayenne
Pinch salt
Directions

Vigorously whisk the egg yolks and lemon juice together in a stainless steel bowl and until the mixture is thickened and doubled in volume. Place the bowl over a saucepan containing barely simmering water (or use a double boiler,) the water should not touch the bottom of the bowl. Continue to whisk rapidly. Be careful not to let the eggs get too hot or they will scramble. Slowly drizzle in the melted butter and continue to whisk until the sauce is thickened and doubled in volume. Remove from heat, whisk in cayenne and salt. Cover and place in a warm spot until ready to use for the eggs benedict. If the sauce gets too thick, whisk in a few drops of warm water before serving.

Read more at: http://www.foodnetwork.com/recipes/tyler-florence/hollandaise-sauce-recipe/index.html?oc=linkback

Thursday, February 28, 2013

Cake baking Tips


Cake tips from a housewife that attempts to bake cakes. Yep- zero expert advice here just simply a couple things I have learned along the way- that work for me.


Baking-
Use helps like parchment paper and baking strips. 
Lining your pan with parchment gives you even edges and an easy removal.
 Grease your pan and flour it if you don't have parchment- Use flour for white cakes and cocoa for chocolate cakes when dusting.
To better adhere your parchment spray your pan, use as a "glue" to affix paper, then lightly spray again.


Baking strips are available from Wilton, they come in various lengths and when applied to the outside of your pan will keep the cake from rising in the center creating a more dense cake that doesn't require much if any leveling. Be sure and follow directions when using- They MUST be soaked in water first!


Don't over bake or under bake your cakes but.... bake on the lesser amount of time required. What I mean by that is test your cake at the least required amount of time for baking. If they test in the center as done get them out! Any over baking at all begins to toughen the texture.
Always use a cake tester- everyone used a toothpick when I was growing up, feel free to use in a pinch but I recommend a metal one, mostly because when hot from the cake they clean up quickly with a wipe and can be reused eliminating the search for more toothpicks and spilling them on the floor and then jamming them into your feet- not that I have ever done that. Cake testers have a way of disappearing in the drawer so keep it where you can find it!


Let cakes cool!!!!!!
Best ways to ruin a cake you will decorate-
removing from pan too quickly
icing when warm
DON'T DO IT
Let it cool- go make fondant or something- go clean the bathroom- get away from the cake if you have the urge to ice.
Trust me I have done this too many times.
In fact feel free to freeze your cake until tomorrow if you like. Wrap it in wax or parchment paper then seal with plastic wrap.


Use the right cake mix.
If your going to do any stacking, carving, or layering make sure your cake can handle it. A Box cake is great for a simple swirl of icing but if your going to try your hand at a topsy turvy cake- they won't cut it- literally.
Use a sponge or madeira or a trusted recipe from a cake book that specializes in cake making.

I will link some cake books I like at the bottom of the post.


Icing
When working in layers- try to keep them even. When they just are not even- happens to me all the time- use your icing as a filler. Always place an icing edge between your layers and fillings. The icing boarder will eliminate the gap and will keep any raspberry filling from oozing out and mixing with your finished layer.


Make butter cream icing;
1 cup butter, softened
4 c powdered sugar (adjust to consistency needed)
1/4 c milk
2 tsp vanilla
Cream butter, add 4 c powdered sugar, milk and extract. Add remaining sugar until smooth spreadable consistency. Adjust thickness of icing with milk and powdered sugar amounts. 


See the gap here in above photo- This occurs when the cake is uneven and the icing boarder is insufficient. If you refer to the top photo you will see this cake had massive orange flowers on it so I was able to hide the gap. It would have been better to trim  and level the cake!
But when you do......
you get crumbs!!! Lots of crumbs- so what then?

The crumb coat-

If you don't crumb coat, now is the time to start!
Ice your cake in a thin layer- Do NOT worry about how it looks or all the crumbs in it!
Now put it in the fridge for 30 minutes up to a couple hours.
 Ice your cake when the cake is cool and all those nasty crumbs are fixed in place. You will have a much smoother and easier time icing now.
crumb coat


icing over crumb coat


Fondant-
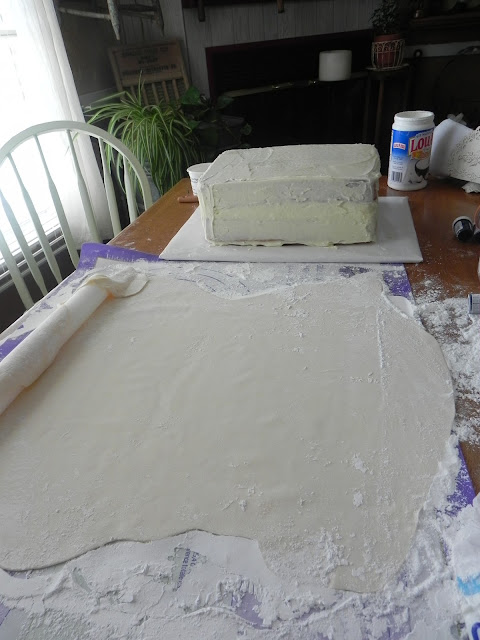
If you like to use fondant you can place it directly over your crumb coat. It is best to chill your cake before applying fondant like you would between icing layers.
Fondant can be bought at cake supply stores or where ever you find Wilton cake decorating supplies.
 Home made Fondant-
See recipe for marshmallow fondant HERE

Non marshmallow homemade fondant
2 pounds powdered sugar
5 tsp powdered gelatin- Like Knox unflavored gelatin
1/4 c water
1/2 c corn syrup
1 1/2 TBS glycerin- sold in Wilton aisle

Stir gelatin and water together in a sauce pan, let set for 3 minutes to bloom.
Stir in corn syrup and glycerin and heat on med until gelatin is dissolved, stir constantly- mixture will burn.
In a large mixing bowel place powdered sugar and mix in gelatin until well combined.
I do not have a powerful mixer so I do most of my fondant mixing and kneading on a silpat mat. I also use the Wilton fondant mat. Be sure and place powdered sugar onto surface to prevent sticking .
Tip- if mixing on a mat or counter, grease surface and hands with crisco then place large amount of powdered sugar and make a well, pour in gelatin and begin incorporating.

Some of my favorite cake books- not exclusive these are just some I have and use.
Cake Decorating for the first time
click Here for info


Cakes and Cake Decorating
Info

Beginner's Guide to Cake Decorating (Love Food) (Making Cakes)

info

Party Cakes: 45 Fabulous Cakes for All Occasions, with Easy Ideas for Children's Cakes
info

Essential Guide to Cake Decorating
info

All things Wilton

Related Posts Plugin for WordPress, Blogger...