Sunday, December 23, 2012

Black Olive Penguins and Igloo Cheeseball


Here is a fun idea for your next Winter/Christmas party. Almost too cute to eat!

 For penguins use a jumbo and a small black olive. Slice the jumbo down the center and stuff with cream cheese. Cut a slice of a large carrot and cut out a small triangle, this will make the feet and the slice will be the beak. We also cut the beak in half, thickness wise because it was too thick.
Make a slit in small olive and insert beak, place a toothpick down the center to hold it all in place.


The Penguin Maker


Igloo
Mix 3 packages softened cream cheese with a large bag of Mozzarella, season with salt and pepper. To form igloo use a bowl, shown here is 1/2  of the ball pan from Wilton. Line with Saran Wrap, place cheese inside, cover with another layer and chill.
To make igloo invert and unwrap cheese, pinch and mold by hand, an entrance. Score ice cube design by using a toothpick, dragging it around in circles and then up and down.
Use left over cream cheese for snow around igloo and place penguins.

Friday, December 21, 2012

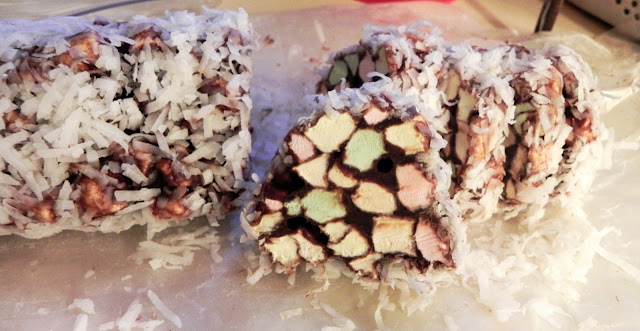
Cathedral Cookies


Beautiful stain glass effect, chewy chocolate delight!

Cathedral Cookies
1 c chocolate chips
2 Tbs softened butter
1 egg, beaten
3 c pastel mini marshmallows
1/2 c pecans or walnuts chopped, optional
1 c flaked coconut

In heavy saucepan, melt chocolate chips and butter over low.  Remove  a couple Tbs of choc and stir into another bowl with egg, mix well and add back to chocolate on stove.
Cook and stir over low heat 2 minutes. Pour into bowl, let cool 15 minutes, stirring twice.
Add marshmallows and nuts. Chill 30 minutes.
Place on sheet of wax paper and form into a roll. Place on another sheet of wax paper covered with coconut, roll cookie until coated, seal in wax paper and freeze 4 hours.
Slice 1/2 in, store in airtight container in fridge.


Thursday, December 20, 2012

NO Time for Gingerbread Caramel Cabin

 Love the idea of the gingerbread centerpiece but don't have the time or the patience? Here is an easy alternative.


Needed materials
caramels
cookies or graham crackers
frosting- home made or store bought
sugar cones for ice cream
sprinkles
assorted candies/decorations


HomeTalk generously gave away some party supplies  to throw a party for friends! The package included a beautiful bell choche from Wayfair, perfect for a centerpiece showcasing edible winter bliss!


On a small piece of wax paper- this helps with transport- "glue" with frosting the  unwrapped caramels. Continue to build, cut caramels in half when you get to the roof.

 I used some fig cookies for the roof, you can use grahams or whatever is handy and the right size for your cabin.

 Use green frosting for the trees, sprinkle with snowflakes, glitter or any cake decorations you like


I used a good smathering of frosting to anchor everything in place and topped it with more sprinkles and a small bit of blue sanding sugar.
There you have an easy centerpiece! So easy even the kids can make them!

Thursday, November 29, 2012

Farmhouse Cheddar


After the cheese press was completed I set out to try my first hard cheese. Jeri at New England Cheesemaking suggested Farmhouse Cheddar as the easiest, fastest first cheese to make.


I am going to post the recipe as it appears in Home Cheesemaking and then will tell you what I actually did differently.

2 gallons whole milk
1 packet direct set mesophilic starter or 4 oz prepared mesophilic starter
1/2 tsp liquid rennet or 1/2 rennet tablet- diluted in 1/4 c cool unchlorinated water
1 Tbs cheese salt
cheese wax
clean break of curds


Heat milk to 90 degrees F (*goat's milk to 85)
Add starter and stir thoroughly, cover and let ripen 45 minutes.

Add the diluted rennet and stir gently with an up and down motion for 1 minute, if using farm fresh milk top stir 1 minute no more than 1/2 inch deep to blend butterfat., cover and let set at 90 degrees* for 45 minutes or until curds give clean break.  Cut into 1/2 in cubes. See above photo.

Place the pot in a sink full of hot water and  heat curds to 100 degrees, increasing temp slowly- I found this the hardest part, it says to increase about 2 degrees every 5 minutes but mine just stayed hotter so I really only added hot water once. Just keep checking your temp at various levels. Gently stir from time to time, I used this to keep it from building too much heat, it also keeps your curds from matting.
Your curds will shrink some and your whey amount will increase.
cover and let set 5 minutes


Pour curds through a cheesecloth lined colander, tie corners in a knot and hang bag in draft free spot for 1 hour. Curds need to stay warm, I left them hanging in the sink with the warm pot below .
Place curds in bowl and break apart, Add salt.
Firmly pack into 2 pound mold lined with cheesecloth, cover top, apply 10 pounds pressure 10 minutes, remove, flip cheese and re-wrap, press at 20 pounds for 10 minutes.
Repeat and press at 50 pounds for 12 hours.

filled gallon jugs of water weight approx 8 pounds


first press


second press


after last press

Remove cheese and peel away cheesecloth, air dry at room temp on a wooden board until rind has developed, 2-4 days, flipping often.
Wax cheese
Age for at least 1 month
yield- 2 pounds

So.....
Here is a few things I did different and my results
first I thought I had too big of a mold so I doubled the recipe, my pot only fit 3 1/2 gallons though- ended up being 2 gallons of raw milk and 1  1/2 gallons store bought whole.
Doubled everything else and it worked out fine.
I think I should have waited another day or two for the air dry, I rushed it a little and fought a bit of mold, nothing to worry about but a little more drying would have helped I think.
If you see some white mold forming, wipe the area with vinegar.
Waxing-
Devote your pot and brush to permanent waxing- they will be of no use for anything else again.
waxing is messy! I have a double boiler that I now will use and also use for storage to keep the wax in. As we unwrap the cheese I will also just toss in the wax because you can remelt and reuse it.

After trying the cheese-
there was minimal white mold, easily scraped off no harm to the cheese and I think again it was because it needed more air dry time before waxing.
Sharp taste, dry and a little crumbly just like the recipe said it would be. I think it needs a cracker, my husband ate it as is and the dog liked it...so it must have worked!
Now onto more variety!!


Wednesday, November 28, 2012

Chocolate Butter Snowmen Cookies


Pinterest Inspired Snowman Cookies!

Cute and yummy and just in time for cold winter days.

Chocolate Butter Cookies-
 1 c sugar
1 1/2 c butter, softened
2 egg yolks
2 tsp almond extract
3 c all purpose flour
1/2 c cocoa

Heat oven to 375
Combine butter, sugar, almond extract, and yolks, Cream until fluffy.
Combine flour and cocoa, sift, and gradually add to creamed mixture.
Shape into balls about 2 inches, flatten with back of glass, note- there is no leavening in these cookies so the size you make them is pretty close to the final size.
I also used a smaller glass and created a small well at the edges of the cookies to help contain the chocolate.
Bake 9 minutes, remove and cool on wire racks.


Melt white chocolate, almond bark or Wilton Candy melts in double boiler or in microwave, spoon a puddle onto each cookie.
While chocolate is still wet add hats.
For large hats use 1/2 large Resee's cup and 1/2 small Resee's cup.
For small hats use only 1/2 small cup.
Place candy eyes, or chocolate chips for eyes. (candy eyes may be purchased at cake decorating shops)


Finishing touches
When chocolate is cooled you may now pipe noses, mouths, and if you are making frosting eyes do this also when chocolate has cooled, placing frosting onto warm chocolate ends up in a mess!
Make a small amount of frosting or use store bought or the Wilton cake tubes, (Wilton works well because you can screw on the top of a coupler and a tip, then save left over frosting at room temp and most products can be purchased at Walmart, Michaels an Hobby Lobby, plus who wants to make black frosting!)

I used gel tube icing for the holly on the hats.


Friday, November 16, 2012

How to Make Your Own Cheese Press


Time to start the hard cheese!
I got my husband talked into fabbing up a home made cheese press.
Really it was so easy we should have done it a long time ago. I think I could have done it myself, but then I wouldn't have anything to bother him with.


We got two drop boards, small boards left over from trimming larger ones, at a local hardware store, These are usually available for a great price, I think we paid about a dollar for both.


a piece of PVC pipe, we went with 6 inch for now but you can make various sizes for the cheese wheels you will be making.


a smaller piece of PVC 3" for use as a ram to help apply even pressure on the metal disk that will rest on the cheese. The disk was in the shower supply section.

All thread rod cut into two 12" pieces and wing nuts hold everything in place and allow for adjusting pressure.


Use washers top and bottom

Less than $20 in materials for a great cheese press that comes apart easily for storage.

shown in use

Thursday, November 8, 2012

Crock Pot Pumpkin Butter- home roasting pumpkin and seeds


Pumpkin Butter
mmmm can you smell it?
What smells better than Fall?
Crisp air, apple cider and pumpkin anything!


This year I grew my own pumpkins for the first time! We had a dry year but they didn't seem to mind, my main chore was keeping them watered and keeping Squash Vine Borers away! Dirty buggers!

I used small baking pumpkins 
There are many varieties of pumpkins/squash that cook well, Jack o Lanterns do not.
Cut in half, clean out and save the seeds for roasting, place pumpkin halves cut side down in a pan filled with an inch of water. Bake at 300- 350 until soft.
Scrape the meat from inside and disguard peels.


  Easy Crockpot Method
Place your pumpkin in crock pot, you can use canned store bought if you like.
I used about 6 quarts, you may hand blend for smoother pumpkin, I did not, mine was pretty soft and easily mashed, this could vary based on variety cooked.
add 4 c sugar
1 Tbs cinnamon
1 tsp ginger
1/2 tsp cloves
1/2 tsp nutmeg
cover and cook on low for several hours, stirring occasionally. Pumpkin will reduce and thicken turning golden brown. If you find too much water gathering at each stir, you can leave the lid cracked and cook on high for about an hour to help reduce some of the moisture.
Cooking should take anywhere from 10- 15 hours with this much pumpkin, adjust as needed for your crock pot and amount of ingredients.
When done, place  in hot jars, seal, and water bath can for 10 minutes.
If you don't can you can freeze in containers.
 Served here with English Muffin Bread


for seeds-
I clean them as best I can, soak in a bowl full of water saturated with salt. Approx 5 c water and 1/2 c salt, stir every few hours. After soaking for 24 hours, drain seeds and place on baking sheet, cook at 200 degrees, stirring every 15 minutes until seeds are dry and water has evaporated. Cool and store in air tight container.

Friday, November 2, 2012

Wilton Win

A while back I pinned on Pinterest some images of things I have done with Wilton Candy Melts.
Wilton was having a contest via Pinterest where you created such a board and entered it into a random drawing.
I was quite excited to wake up to an email stating I had won a $200 online shopping spree! I wanted to share with you what I picked out.


I have always wanted these 3 in 1 cake caddies, well, since I saw them at Michaels. Great to carry 12 cupcakes, or 24 minis or a 9X13 sheet cake. Nice. Good quality but lots of needed storage space! Keep that in mind if your toying with purchasing these.


A great tool caddy. Built in storage for tips and adjustable bottom, it really fits a lot, if you are a master cake decorator you would probably need a couple or other storage options. I truly love this piece!


Fondant tools, a cutter, a scorer and a misc decorating tool kit.

King size muffin tin, to go along with my current muffin top. (who am I kidding? I surpassed muffin top a long time ago and am well established in an entire batch of bread dough)

The chocolate melting pot. I like this but I would say I really am partial to a double boiler so this will get minimal use I think. Great for small projects though. Nice quality.

The other item I ordered was out of stock, I picked the bag filler/dryers. I have to say...I don't like them, I guess they are better than nothing, but still awkward to use. Wilton graciously tucked in some decorating bags for being out of stock of the item I wanted, which put me over the 200 free dollars. Very nice of them, plus the package came quickly!
Thanks to Wilton for the great giveaway and the fabulous products you sell. As for the out of stock item, I went to Michaels with my 40% off coupon and bought it too! It was the cake lifter.
The reality of a want to be cake maker!


Related Posts Plugin for WordPress, Blogger...